Install the framework
These are the steps required to install a new instance of the custom framework on the Channel Mobile application server
The first step is to collect all the required information for the vhost. The information can be obtained for the system Administrator. At the time of this edit the System Administrator is Paul Michaels. The information that needs to be collected is:
- The DNS name of the new website ( This is also know as the site URL). This is typically something like https://xxxx.agentchat.co.za
- The virtual host details:
- DocumentRoot (this is the root directory of the site). This will typically match the DNS name of the site. Something like /websites/xxxx.agentchat.co.za.
- The server the database is hosted on. This is typically localhost
- The database name
- The database username
- The database password
- Once all the information has been collected, logon to the application server cmsvr24 using ssh
- You will need root access, so depending on your privileges you can either become root, or use the sudo utility to execute the privileged commands.
- Navigate to the new document root
- Execute the following command to download the set-up files. sh /websites/GetSetupFiles.sh from the document root on the new site
- After the script has completed. You need to complete the installation from a web browser.
The basic files required for the installation is now in the document root.
Navigate to the URL and execute the install.php script (https://xxxx.agentchat.co.za/install.php)
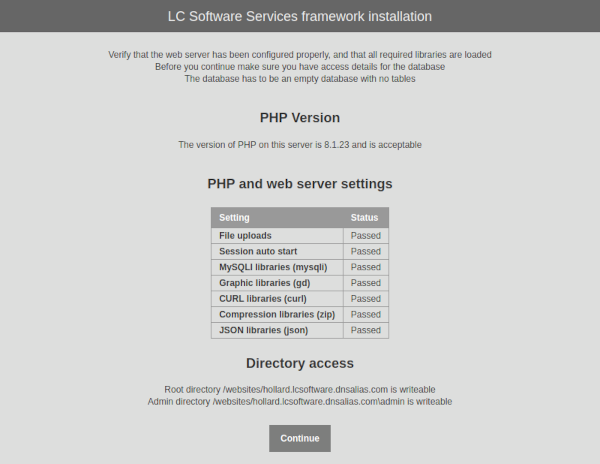
The first screen will display the results of the dependency checks. These checks include the php version and other php libraries.
If any of these fail, please refer to your system administrator.
You can now click the Continue button to move to the next step in the installation process.
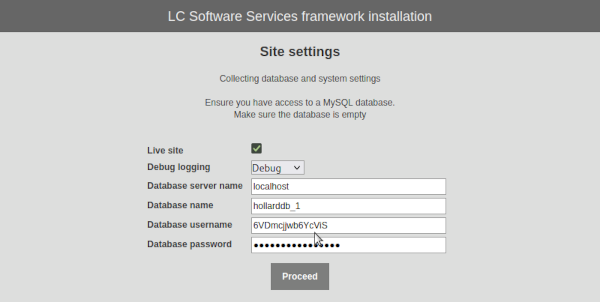
You now have to type in the database settings and other site settings. Check the Live site checkbox to make sure the site is configured as a live site, and not a development site.
You can also change the Debug logging to Debug, as Trace logs a lot of information that is not needed unless you have to trace issues.
The logging level can be adjusted and any stage by editing the Configuration.class file.
Click the Continue button to continue to the next step.
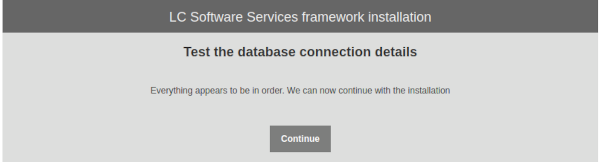
This screen will confirm if the database details have been entered correctly and the system is able to connect to the database.
If there are no errors click the Continue to continue to the next step.
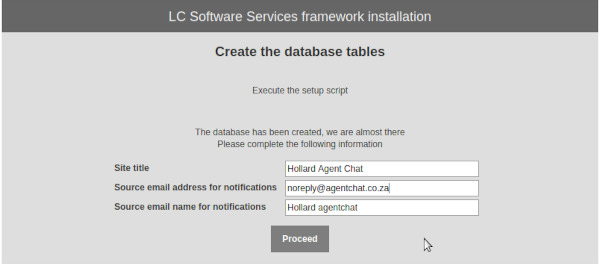
After the database has been created and populated, you will be presented with a screen to configure the name and email settings for the site.
Enter a site title for the website, and a source email address and name. The source email address will be the from email address of notification messages, and the email name will be the friendly email name of the from address.
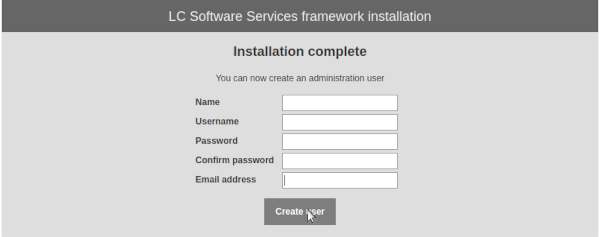
After the installation is complete, you need to create a user on the system. This user will be the administrator.
Enter all the required details, and make sure the email address is valid, as lost password emails will be sent to this email address.
After completeing the infortmation, click the Create user button to continue.

This is the final screen for the installation script. You can now click on the Logon to admin console.
This will take you to the login screen of the admin site.